English
 中文简体
中文简体
 日本語
日本語
 Español
コンテンツ
- 1 The Short Answer: How to Clean Stainless Steel Pans Effectively
- 2 Why Stainless Steel Pans Get Dirty Differently Than Other Cookware
- 3 Everyday Cleaning After Normal Cooking
- 4 How to Remove Stubborn Stuck-On Food
- 5 Removing Rainbow Discoloration and Heat Stains
- 6 Dealing With White Spots and Mineral Deposits
- 7 Can You Put Stainless Steel Pans in the Dishwasher?
- 8 Cleaning the Outside and Bottom of Stainless Steel Pots and Pans
- 9 Cleaning Methods Compared: Which Works Best for What
- 10 Restoring an Old or Heavily Stained Stainless Steel Pan
- 11 Preventing Future Staining and Sticking
- 12 Frequently Asked Questions About Cleaning Stainless Steel Cookware
- 12.1 Is it safe to use vinegar on stainless steel pans every time?
- 12.2 Why does my stainless steel pan have rust spots?
- 12.3 Can I use oven cleaner on the outside of stainless steel pans?
- 12.4 Does cleaning frequency affect the lifespan of stainless steel pots and pans?
- 12.5 Are all stainless steel pans cleaned the same way?
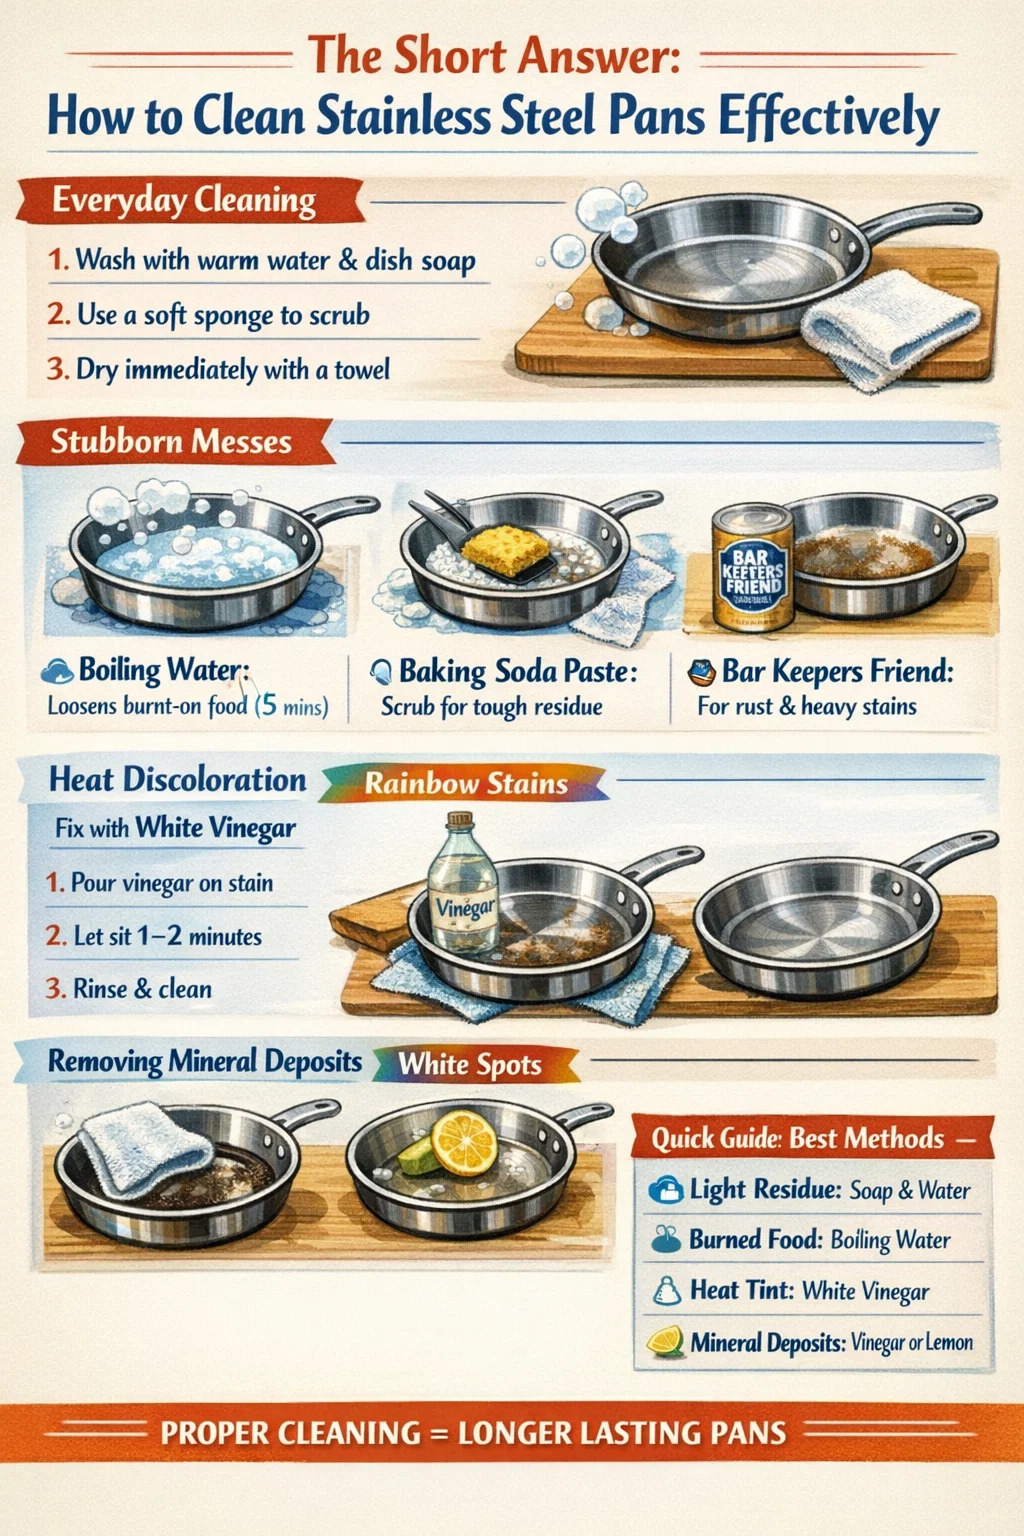
The Short Answer: How to Clean Stainless Steel Pans Effectively
For everyday cleaning, warm soapy water and a soft sponge are all you need after cooking. For stubborn stains and discoloration, a paste made from baking soda and a few drops of dish soap applied with a non-scratch scrubber removes the vast majority of residue without damaging the pan's surface. Boiling water directly in the pan loosens burned-on food in under five minutes. These three methods handle roughly 95% of what home cooks encounter with stainless steel pots and pans on a daily basis.
If you own any stainless steel cookware — whether that's a single sauté pan or a full set of pots and pans — knowing how to maintain the surface properly extends the lifespan of your investment significantly. High-quality stainless steel pans can last 20 to 30 years with proper care, but improper cleaning habits can cause pitting, discoloration, and surface degradation within just a few years of regular use.
This guide covers every cleaning scenario you're likely to face — from a quick wipe-down after scrambled eggs to dealing with that stubborn rainbow tint that shows up after high-heat cooking. The methods are arranged from quickest and most routine to more intensive restoration approaches.
Why Stainless Steel Pans Get Dirty Differently Than Other Cookware
Stainless steel is an alloy — typically made up of iron, chromium (at least 10.5%), nickel, and sometimes molybdenum. The chromium content is what creates the self-repairing oxide layer that gives stainless steel its corrosion resistance. But this same surface can react in unexpected ways when exposed to heat, minerals in water, acidic foods, and certain cleaning chemicals.
Unlike nonstick pans where food slides off with almost no effort, stainless steel pots and pans are designed for high-heat searing and browning — which means food is meant to stick initially, then release as it forms a crust. This intentional sticking behavior is also what leads to the stuck food and discoloration that makes people nervous about cleaning their pans.
There are three common types of "dirt" on stainless steel cookware:
- Stuck-on food residue — proteins and starches that have bonded to the surface during cooking
- Heat discoloration (rainbow or blue tints) — caused by oxidation of the chromium layer at high temperatures, not actual damage
- White chalky deposits — mineral buildup from hard water, particularly calcium and magnesium
Each of these responds to different cleaning approaches. Using the wrong method — like reaching for steel wool on a heat tint — can create micro-scratches that actually make future sticking and staining worse. Understanding what you're dealing with before you start cleaning saves both time and the surface of your pan.
Everyday Cleaning After Normal Cooking
The single most important habit for keeping stainless steel pots and pans clean is timing. Cleaning a pan while it's still warm (not screaming hot, just comfortably warm) takes a fraction of the effort compared to cleaning one that has been left to sit and harden for hours.
Step-by-Step for Routine Cleaning
- Let the pan cool for 3–5 minutes after cooking — thermal shock from cold water on a very hot pan can warp it over time
- Add a small amount of warm water and a drop of dish soap directly to the pan
- Use a soft sponge or nylon brush in circular motions, following the grain of the steel (stainless has a faint directional polish)
- Rinse thoroughly with warm water
- Dry immediately with a clean towel — air drying leads to water spots from mineral deposits
Drying immediately is not just cosmetic advice. Leaving stainless steel wet, particularly with hard water, allows calcium and chloride deposits to concentrate on the surface as the water evaporates. Over time, this can cause pitting — tiny holes in the steel that are permanent. In areas with hard water (a hardness level above 120 mg/L is considered hard), this happens faster than most people expect.
What to Avoid in Daily Cleaning
- Avoid soaking stainless steel pots and pans for extended periods — prolonged exposure to water, especially salty or soapy water, increases the risk of pitting
- Don't use chlorine bleach or bleach-based cleaners — chlorine actively attacks the chromium oxide layer
- Skip the steel wool — it leaves behind tiny iron particles that can cause rust spots even on stainless steel
- Avoid harsh abrasive powders on a regular basis; occasional use is fine, but repeated abrasion dulls the finish over time
How to Remove Stubborn Stuck-On Food
Even with the best technique, food sticks to stainless steel pans. This is especially true when cooking proteins like chicken skin, fish fillets, or eggs — foods that bond strongly to metal at first before they naturally release once cooked through. When food has already burned on or dried hard, a more deliberate approach is needed.
The Boiling Water Method (Best for Burned Food)
This is the most underused technique for cleaning stainless steel pots and pans, and it's remarkably effective:
- Add enough water to cover the burned area by about an inch
- Bring to a full boil on the stovetop
- Use a wooden spoon or silicone spatula to scrape the bottom while the water is boiling — most residue releases within 2–4 minutes
- Pour out the water and wash normally while the pan is still warm
Adding a tablespoon of baking soda to the boiling water increases effectiveness for particularly stubborn carbon deposits. The mild alkaline reaction helps lift protein-based residue from the steel surface without any abrasion.
The Baking Soda Paste Method
For baked-on grease and food that has dried to the sides or bottom of the pan:
- Wet the pan slightly so the surface is damp
- Sprinkle 2–3 tablespoons of baking soda directly onto the problem areas
- Add a few drops of dish soap to form a paste
- Let it sit for 10–15 minutes
- Scrub with a non-scratch scrubbing pad in the direction of the grain
- Rinse and dry
The mild abrasiveness of baking soda (it scores a 2.5 on the Mohs scale, far softer than steel) provides just enough mechanical action to remove residue without scratching the surface in any meaningful way. This is safe to use on all grades of stainless steel cookware.
Bar Keepers Friend for Tough Cases
Bar Keepers Friend is a powdered cleanser containing oxalic acid, and it's widely regarded as one of the best commercial products for stainless steel pots and pans. Oxalic acid dissolves iron oxide (rust tints) and mineral deposits without attacking the underlying chromium layer. It's also effective on grease residue and heat discoloration.
To use it: make a paste with water, apply to the affected area, leave for no more than one minute (longer exposure can dull the finish), scrub gently, and rinse thoroughly. Always wear gloves, as oxalic acid is a mild irritant to skin.
Removing Rainbow Discoloration and Heat Stains
That iridescent rainbow or bluish tint that appears on stainless steel pans after high-heat cooking is one of the most commonly misunderstood things about this type of cookware. Many people assume the pan is ruined or that a chemical reaction has damaged it permanently. In reality, heat tint is a purely cosmetic issue caused by the temporary thickening of the chromium oxide layer at high temperatures — the pan is not damaged and is completely safe to use.
That said, it's easy to remove if you prefer your pans looking polished. White vinegar is the most effective household solution:
- Pour enough undiluted white vinegar to cover the discolored area (roughly 1/4 to 1/2 cup for a medium sauté pan)
- Swirl it around to coat the surface
- Leave for 30 seconds to 2 minutes — you'll often see the rainbow tint dissolve in real time
- Pour out the vinegar and wash the pan normally
The acetic acid in white vinegar (typically 5% concentration) reacts with the oxidized chromium layer and dissolves it evenly, restoring the uniform steel appearance. This method works on pots and pans of all sizes and is safe to repeat as often as needed.
For particularly stubborn heat stains that don't respond to vinegar alone, Bar Keepers Friend applied after the vinegar treatment will handle the remainder.
Dealing With White Spots and Mineral Deposits
White or grayish spots on stainless steel pots and pans are almost always caused by hard water — specifically by calcium carbonate and magnesium deposits left behind when water evaporates. These are especially visible on the outside of pans after dishwasher cycles or on the bottom of pots used for boiling water repeatedly.
These deposits are alkaline in nature, which means they respond well to mild acids:
- White vinegar: Soak a cloth or paper towel in undiluted white vinegar and lay it over the affected area for 5–10 minutes, then wipe clean
- Lemon juice: Works via citric acid in the same way — cut a lemon in half and rub the cut face directly on the deposits, leave for a minute, then rinse
- Diluted cream of tartar: Mix 1 tablespoon with enough water to form a paste, apply for several minutes, then scrub gently and rinse
If you cook frequently and live in a hard water area, consider wiping your pans with a small amount of white vinegar as a final step after washing and before drying. This prevents buildup entirely rather than having to remove it later.
Can You Put Stainless Steel Pans in the Dishwasher?
Technically yes — most stainless steel pots and pans are dishwasher safe. But the more relevant question is whether you should, and the honest answer for someone who wants to maintain their cookware is: hand washing is meaningfully better for longevity.
Here's why dishwashers create problems for stainless steel cookware over time:
- Dishwasher detergents contain chlorine compounds and strong alkalis that gradually attack the chromium oxide layer
- The high heat of drying cycles accelerates mineral deposit formation, particularly on the outer surfaces of pans
- Pans can knock against other items during the cycle, causing dents and scratches on the cooking surface
- If pans contain any aluminum-based components (common in tri-ply constructions), dishwasher detergent can cause oxidation that appears as dark staining
If convenience is the priority, an occasional dishwasher cycle won't ruin a quality stainless steel pan. But running high-end pots and pans through the dishwasher daily will visibly degrade them in 12–18 months compared to the polished appearance maintained by hand washing.
Cleaning the Outside and Bottom of Stainless Steel Pots and Pans
The exterior of stainless steel cookware takes a beating that the inside doesn't — direct flame, grease spatters, and heat discoloration all accumulate on the outside of pots and pans over time. Many people clean only the interior and then wonder why their cookware looks aged and stained on the outside after a year of regular use.
Exterior carbon buildup from gas flames is particularly stubborn. The combination of high heat and grease produces a form of polymerized carbon that bonds tightly to the steel. Standard dish soap has almost no effect on it.
Method for Exterior Cleaning
- Make a thick paste of Bar Keepers Friend or baking soda with just enough dish soap and water to bind it
- Apply generously to the exterior, including the bottom of the pan
- Let sit for 15–20 minutes
- Scrub with a non-scratch pad or an old toothbrush for edges and rivets
- Rinse and inspect — for very heavy buildup, repeat the process
For the most extreme exterior carbon buildup — the kind that accumulates over years of use without cleaning — a paste of cream of tartar mixed with hydrogen peroxide can break down the carbon more aggressively. Apply, wait 20 minutes, scrub with a dedicated scrubbing pad (not the one used for the cooking surface), and rinse thoroughly.
Handles, rivets, and welded joints collect grease and grime that requires an old toothbrush or a narrow bottle brush to reach properly. These areas are easy to overlook but can make an otherwise clean pan look dirty.
Cleaning Methods Compared: Which Works Best for What
Different cleaning challenges require different tools. The table below summarizes when to use each method for stainless steel pots and pans:
| Cleaning Problem | Best Method | Time Required | What to Avoid |
|---|---|---|---|
| Light everyday residue | Warm water + dish soap | 2–3 minutes | Long soaking |
| Burned-on food | Boiling water method | 5–10 minutes | Steel wool scrubbing |
| Grease and food residue | Baking soda paste | 15–20 minutes | Abrasive pads |
| Rainbow/blue heat tint | White vinegar soak | 1–3 minutes | Bleach cleaners |
| White mineral deposits | Vinegar or lemon juice | 5–10 minutes | Harsh scrubbing |
| Heavy staining / rust tints | Bar Keepers Friend | 3–5 minutes | Leaving on too long |
| Exterior carbon buildup | BKF or baking soda paste + soaking | 20–30 minutes | Bleach or oven cleaners |
Restoring an Old or Heavily Stained Stainless Steel Pan
If you've inherited old stainless steel cookware or pulled out pots and pans that haven't been used in years, a deeper restoration approach can return them to near-original condition. Unlike nonstick pans, which are essentially disposable once the coating wears out, stainless steel cookware can be restored almost indefinitely with the right techniques.
Full Restoration Process
- Start with the boiling water method to loosen any stuck-on material from the cooking surface
- Apply white vinegar to the interior and let it soak for 5 minutes to address any heat tint or mineral deposits
- Use Bar Keepers Friend on the entire interior surface, scrubbing gently in circular motions for 2 minutes, then rinse
- Address the exterior with a baking soda and dish soap paste, leave 20 minutes, scrub, rinse
- Dry thoroughly and then apply a tiny amount of mineral oil or cooking oil to the interior surface — buff it in with a paper towel and wipe away the excess
That final oil step is optional but beneficial — a microscopic film of oil fills surface micro-scratches and helps the pan perform better during the first few cooking sessions after a deep clean. It's the same principle as seasoning cast iron, just applied far more lightly.
One thing that cannot be fixed by any cleaning approach is deep scratches or pits. Physical damage to the surface is permanent. This is why the earlier advice about avoiding steel wool and harsh abrasives matters — once the surface is deeply scratched, it becomes harder to clean and more prone to food sticking in the future.
Preventing Future Staining and Sticking
Prevention reduces the amount of cleaning needed significantly. Most of the common complaints about stainless steel pans — food sticking badly, excessive discoloration, recurring grease buildup — trace back to a few fixable cooking habits.
The Mercury Ball Trick for Perfect Preheating
The most effective way to prevent food from sticking to stainless steel pots and pans — and by extension, the most effective way to reduce how much cleaning you need to do — is proper preheating. The "mercury ball test" is the standard technique used by professional cooks:
- Place the dry pan over medium heat with no oil
- Flick a few drops of water into the pan after 1–2 minutes
- If the water splatters and evaporates immediately, the pan isn't hot enough yet
- When the water forms a single rolling ball that glides around the surface (the Leidenfrost effect), the pan is at the right temperature
- Add your oil at this point, let it heat for 30 seconds, then add food
At the proper temperature, the pores in the steel's surface are expanded uniformly and the oil forms a barrier that genuinely prevents sticking. This reduces the amount of stuck-on food you'll have to deal with after cooking.
Other Habits That Reduce Cleaning Work
- Don't add salt to cold water in a stainless steel pot — add it after the water comes to a boil. Salt in cold water can cause pitting, especially in lower-grade steels
- Bring proteins to room temperature before adding them to the pan — cold proteins from the refrigerator stick far more aggressively
- Avoid using aerosol cooking sprays on stainless steel — they leave a difficult-to-remove polymer residue that builds up over time and is far harder to remove than normal food residue
- Clean exterior surfaces after every few uses rather than letting carbon build up over weeks — once it polymerizes, removal takes considerably more effort
- Store pots and pans with a soft cloth or pan protector between them to prevent surface scratching during storage
Frequently Asked Questions About Cleaning Stainless Steel Cookware
Is it safe to use vinegar on stainless steel pans every time?
Yes, with one caveat: don't leave vinegar sitting in a stainless steel pan for extended periods — more than 30 minutes on a regular basis is unnecessary and can slightly affect the finish over time. For routine heat tint removal, a 1–5 minute application followed by thorough rinsing is both safe and effective. White vinegar at 5% concentration is not strong enough to cause any meaningful chemical reaction with the chromium layer during normal use.
Why does my stainless steel pan have rust spots?
True rust on stainless steel cookware is rare and usually indicates one of three things: the pan was cleaned with steel wool, which left behind iron particles that have now oxidized; the pan has been exposed to chlorine (bleach, salt, or chlorinated water for extended periods); or the pan is a very low-grade steel. In most cases, the orange spots are not rust from the pan itself but from external iron contamination. Bar Keepers Friend removes these spots reliably.
Can I use oven cleaner on the outside of stainless steel pans?
Avoid this approach. Oven cleaners typically contain sodium hydroxide (lye), which is highly alkaline and can permanently discolor stainless steel. Some contain chlorine compounds as well. The exterior carbon buildup that builds up on pots and pans from gas flame cooking responds well to Bar Keepers Friend and baking soda paste — there's no need to reach for caustic products.
Does cleaning frequency affect the lifespan of stainless steel pots and pans?
Cleaning frequency itself doesn't cause damage — cleaning method does. Pans that are cleaned promptly after each use and dried immediately tend to maintain their surface integrity better than pans that are left with residue or moisture for hours before washing. The surface of stainless steel can tolerate thousands of gentle cleaning cycles without degradation. What degrades the surface is abrasion, prolonged chemical exposure (particularly chlorine-based products), and thermal shock from rapid temperature changes.
Are all stainless steel pans cleaned the same way?
The cleaning principles are the same across all grades, but polished or mirror-finished pans show scratches more visibly than brushed or satin finishes. If you own pans with a mirror polish (common on some high-end brands), use extra care with scrubbing and avoid any abrasive pad — even a non-scratch pad can leave fine marks on a mirror surface. Brushed-finish pans, which are far more common in everyday cookware sets, are more forgiving. Tri-ply and fully clad pans (with an aluminum core) respond to the same methods as standard stainless, but avoid aggressive dishwasher detergent particularly on the exterior aluminum layers that are sometimes visible at the rim.